 Buggy SnAkE entry for the Js13kGames
After 4 years of slacking off I finally had time, energy and the idea for another game for the Js13kGames contest. With help from Bartek we created a glitched version of the classic game Snake. I would like to show you here the most interesting programming challenges and ideas we came across during development of the buggy SnAkE game.
This year’s theme of the Js13kGames competition is Glitch. We had an idea to recreate a well known classic game and add some glitches to it. We choose Snake because it is one of the easiest game to render in a canvas tag and because I loved the Snake 2 game originally released on the Nokia 3310 phone. I used to spend lots of time mastering it when I was younger, mostly while commuting to school.
It was also important to do something that people know and recognise. I am aware (also from my own experience) that sometimes people are too lazy to read rules of a new game. It is not very practical to make a complicated entry for contests like Js13kGames, where people want to play and test as many different games as possible.
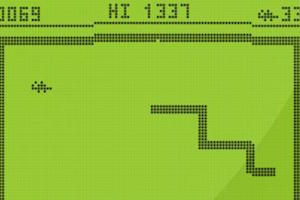
I think that there is no need to explain the rules of classic Snake in much detail. Simply, the player has to control the snake and collect food in order to get more points. Our SnAkE version has three additional features though: glitched graphic, the TRON mode and the ability to go through walls in order to get out of the main play board. We wanted the game to have a retro graphic style, similar to the classic Nokia Snake. We ended up rendering the snake just as a line as it was in the old Nokia’s 3210 ‘Snake 1’ game. The graphical inspiration for bugs was obviously my favourite; Nokia’s 3310 ‘Snake 2’ version. Because of the limited 4 x 8 cell size we were forced to alter a little those original bugs. Hopefully they are still reminiscent of the original ones!
How to program the standard Snake game?
This post’s idea is to focus mainly on the most interesting and some more advanced technical details of the SnAkE game. But in order to understand them, it’s important to be aware of how the classic Snake version works:
Snake.SNAKE = [];

Snake.Game.initSnake = function() {
	for(var i = 0; i < 5; i++) { //let's start with snake length 5
		//horizontal snake starting from the top left
		Snake.SNAKE.push({x: i, y: 0});
	}
};

Snake.Game.paint = function() {
    //paint the board
	Snake.CTX.fillStyle = 'white';
	Snake.CTX.fillRect(0, 0, Snake.CANVASW, Snake.CANVASH);
	Snake.CTX.strokeStyle = 'black';
	Snake.CTX.strokeRect(0, 0, Snake.CANVASW, Snake.CANVASH);

	//store the position of snake's head
	var snakeX = Snake.SNAKE[Snake.SNAKE.length - 1].x;
	var snakeY = Snake.SNAKE[Snake.SNAKE.length - 1].y;

	if (Snake.DIRECTION == 'right') snakeX++;
	else if (Snake.DIRECTION == 'left') snakeX--;
	else if (Snake.DIRECTION == 'up') snakeY--;
	else if (Snake.DIRECTION == 'down') snakeY++;

	this.checkCollision(snakeX, snakeY);

	//if the new head position matches the food,
	//create a new head instead of moving the tail
	if (snakeX == Snake.FOOD.x && snakeY == Snake.FOOD.y) {
		var tail = {
			x: snakeX,
			y: snakeY
		};
		this.ui.updateScore();
		this.initFood();
	} else {
		var tail = Snake.SNAKE.shift(); //take the first cell - tail
		tail.x = snakeX;
		tail.y = snakeY;
	}

	Snake.SNAKE.push(tail); //puts back the tail as the new head

    //paint the snake
	for (var i = 0; i < Snake.SNAKE.length; i++) {
		var cell = Snake.SNAKE[i];
		this.paintCell(cell.x, cell.y);
	}

	//paint the food
	this.paintCell(Snake.FOOD.x, Snake.FOOD.y);

	this.ui.paintScore();
};
This is how we started implementing the first version of the game. Originally snake was implemented as an array of objects with x and y coordinates. In the main game loop we have to repaint the whole board (which is just a rectangular canvas), take the snake’s head coordinates and update them based on the player’s key presses.
We have to check a few things before re-drawing the snake. First, if it didn’t collide with the walls or itself. Secondly, if the snake’s head didn’t match the position of randomly generated food. If so, update score points, generate new food and save the food’s position as the new piece of the snake. If there is no food there, just take the current tail and place it in front of the snake, so it will be it’s new head.
This is how to implement the basic Snake game. But in order to introduce glitched features we had to refactor almost everything that I just showed you! Without further ado, let’s focus on the much more interesting parts of the game.
Introducing graphical glitches
In order to easily implement glitched and retro like graphics, we had to divide the whole canvas into 20 x 20 px cells. The whole board (including score points, HI score and bug’s timeout at the top) is represented as a two dimensional array :
Snake.Game.initStateValues = function() {
    this.state = {
		board: [],
		boardWidth: 30,
		boardHeight: 30,
		borderOffset: {
			top: 4,
			bottom: 2,
			left: 2,
			right: 2
		}
	}
};

Snake.Board.initBoard = function(state) {
	var offset = state.borderOffset;

    //create a two dimensional array with no walls at all
	for (var x = 0; x < state.boardWidth; x++) {
		state.board[x] = new Array(state.boardWidth);
		for (var y = 0; y < state.boardHeight; y++) {
			state.board[x][y] = {
				type: null,
				isGlitched: false
			};
		}
	}

    //mark two horizontal lines as walls
	for (x = offset.left; x < state.boardWidth - offset.right; x++) {
		state.board[x][offset.top].type = 'wall';
		state.board[x][state.boardHeight - offset.bottom - 1].type = 'wall';
	}

    //mark two vertical lined as walls
	for (y = offset.top; y < state.boardHeight - offset.bottom; y++) {
		state.board[offset.left][y].type = 'wall';
		state.board[state.boardWidth - offset.right - 1][y].type = 'wall';
	}
};
During the initialisation, the whole board is saved into a board 2d array, where each cell is represented as an object with type and isGlitched properties. After creating the empty board array, we have to mark horizontal and vertical lines as walls, by setting its cells type to wall.
Now the painting algorithm is quite straightforward. We just have to loop through the main board array and paint the elements (wall pieces, food and bugs) in a proper place, with given graphic style and defined color:
Snake.UI.paint = function(state) {
//paint the board
	for (var x = 0; x < state.boardWidth; x++) {
		for (var y = 0; y < state.boardHeight; y++) {
			cell = state.board[x][y];
			if (cell.type === 'wall') {
				var cellPixels = this.cells.wall[this.getWallCellType(x, y, state.board)];
				this.paintCell(x, y, this.color[state.mode].wall, cellPixels, cell.isGlitched);
			} else if (cell.type === 'food') {
				this.paintCell(x, y, this.color[state.mode].food, this.cells.food);
			} else if (cell.type === 'buggybug') {
				this.paintCell(x, y, this.color[state.mode].bug, this.cells[cell.body]);
			}
		}
	}
};

this.paintPixels();
Each 20 x 20 px cell is drawn as 4 x (4 + 1px spacing) pixels. All of those pixels are saved in the pixel array:
Snake.UI = {
    pixels: [],
	pixelsPerCell: 4
};

Snake.UI.initPixels = function(state) {
	this.pixels = [];

	//initialise array of empty pixels
	for (var x = 0; x < state.boardWidth * this.pixelsPerCell; x++) {
		this.pixels.push(new Array(state.boardHeight * this.pixelsPerCell));
	}
};

Snake.UI.paintCell = function(x, y, color, cellPixels, isGlitched) {
	if (isGlitched && typeof isGlitched !== 'number') {
		isGlitched = 0.9;
	}

	for (var i = 0; i < this.pixelsPerCell; i++) {
		for (var j = 0; j < this.pixelsPerCell; j++) {
			if (cellPixels[j][i] && (!isGlitched || Math.random() < isGlitched)) {
				this.pixels[x * this.pixelsPerCell + i][y * this.pixelsPerCell + j] = color;
			}
		}
	}
};
In the paintCell method we just have to go through all of the pixels in given cell and set a proper color. Except in the situation when we want to glitch one cell, eg to show wall’s piece as a portal. In that situation, there is no point of drawing all of the cell pixels. That’s why there is a random number generator in the condition before setting the color. If that number is bigger than 0.9, which happens in 10% of situations, than current pixel is not drawn. This gives us nice and little flickering effect.
As mentioned before, each of the cells are represented as 4 x 4 pixels. This is how food looks:
Snake.UI = {
    food: [
       [       ],
       [ , ,1  ],
       [ ,1, ,1],
       [ , ,1  ]
    ]
};
The paintPixels method looks like this:
Snake.UI.paintPixels = function() {
	var pixelWidth = (this.cellSize - this.pixelsPerCell) / this.pixelsPerCell;
	var pixelSpacing = 1;
	if (Snake.Game.state.mode === 'tron') {
		pixelWidth += 1;
		pixelSpacing = 0;
	}
	var ctx = this.ctx;
	this.pixels.forEach(function(column, x) {
		column.forEach(function(pixel, y) {
			if (pixel) {
				ctx.fillStyle = pixel;
				ctx.fillRect(x * (pixelWidth + pixelSpacing), y * (pixelWidth + pixelSpacing), pixelWidth, pixelWidth);
			}
		});
	});
};
Each cell is drawn as 16 pixels with additional empty spacing in a standard mode. The TRON mode looks little more futuristic, that’s why there is no space between cells.
After setting the pixel’s width and spacing values, we just go through each of the pixels and draw them on canvas with a standard ctx.fillRect method.
Introducing pixels and board array made implementing collision checking much easier and faster.
Before the refactor the collision checking with walls looked like this:
Snake.Game.ifCollided = function(snakeX, snakeY, walls) {
    var i;
    //check if the snakeX/snakeY coordinates exist in the walls' array
    for (i = 0; i < walls.length; i++) {
        if (walls[i].x === snakeX && walls[i].y === snakeY && !walls[i].isGlitched) {
            return true;
        }
    }
};
And after the refactor it was just a one line solution:
if (this.state.board[snakeX][snakeY].type === 'wall') {
    //collision detected
}
The aforementioned big refactor made easier for us to introduce features like flickering walls, pixelated fonts and glitched board. This is how we glitched whole columns:
Snake.UI.glitchPixels = function() {
	var state = Snake.Game.state;

	for (var g = 0; g < state.level - 1; g++) {

		//how far to move the pixels
		var glitchOffset = Snake.Game.random(0, state.level - 1);

		//number of columns to move
		var glitchWidth = Snake.Game.random(1, state.boardWidth * this.pixelsPerCell / 2);

		//direction of move
		var rand = Math.random();

        //which column to move
		var column = Snake.Game.random(0, state.boardWidth * this.pixelsPerCell - 1 - glitchWidth);

		for (var w = 0; w < glitchWidth; w++) {
			var x = column + w;
			for (var o = 0; o < glitchOffset; o++) {
				if (rand < 0.01) { //move column to the left
					var pixel = this.pixels[x].shift();
					this.pixels[x].push(pixel);
				} else if (rand > 0.99) { //move column to the right
					pixel = this.pixels[x][state.boardHeight * this.pixelsPerCell - 1];
					this.pixels[x].unshift(pixel);
				}
			}
		}
	}
};
The glitched graphic feature’s purpose is to make it a little harder to control your snake. The amount of glitches increases as you play. In every game loop, just before painting the pixels, we try to glitch a number of columns. That number is equal to the level achieved by the user (which increases after every 5th food consumed). So if the user reached for example 3rd level, the game will try 3 times to glitch a random amount of columns. In order to do that, we have to calculate the distance to move those columns and how many of them should be altered. Then the random number is generated and based on that we know the direction of the movement. The probability of moving columns either to the left (< 0.01) or to the right (> 0.99) is rather low but if the level is high, there is more chances of generating one or another direction. Also, the amount of glitched columns increases with the level. We have to remove the first column from the rows array and add it to the end of the same array. This operation will move all of the columns to the left. Moving columns to the right is little easier. We just have to copy the last value from the rows array and place it at the beginning of the same array.
I hope that the above code snippet didn’t scare you ;). The following examples will be much easier.
The TRON mode
While reading the Wikipedia’s page about the classic Snake game something interesting occurred to us. It seems that some of the original Snake games had slightly different rules:
In some games, the end of the trail is in a fixed position, so the snake continually gets longer as it moves.
I really liked the various bugs that gave extra points in the second version of the Nokia’s 3310 Snake game. The wiki’s quote gave us the idea for another glitch.
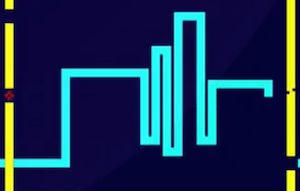 After eating the bug, SnAkE enters the TRON mode
Let’s have a secret mode which will be triggered only after eating a bug. Bugs are generated on the at least second level of the game and there is only 30% chance that it will be shown on the board. And even then, there is a limited amount of time after which the bug will disappear. So it’s rather difficult to get it but when the user succeeds, they will enter the special mode which we called TRON mode (guess why?) in which the tail will stay in one place and snake will start to increase as long as it will reach the normal (non bug) food. It may seem to be difficult but the biggest advantage of that mode is that for each time when snake grows, it get extra points. Thus this is the best method to gain lots of points and break some records.
Here is how the snake works after entering the TRON mode:
Snake.Game.update = function() {
    switch (this.state.board[snakeX][snakeY].type) {

        //if the new head position matches the food
        case 'food': this.consumeFood(snakeX, snakeY);
            break;

        //if the new head position matches the bug
        case 'buggybug': this.consumeBuggyBug(snakeX, snakeY);
            break;

        default:
            if (this.state.mode === 'snake') {
                this.state.snake.shift(); // remove the first cell - tail

                // make it smaller in every paint
                if (this.state.prevLength && this.state.snake.length > this.state.prevLength) {
                    this.glitchSnakeTail(10, this.state.snake.length - this.state.prevLength);
                } else if (this.state.prevLength && this.state.snake.length === this.state.prevLength) {
                    //no need to make it smaller anymore
                    this.state.prevLength = null;
                    this.state.glitchedLength = 0;
                }
            } else if (this.state.mode === 'tron') {
                this.state.score += 1; // score one point for every piece grown in tron mode
            }
            break;
    }

    this.state.snake.push({
        x: snakeX,
        y: snakeY
    });
}
If the snake’s head position does not match either food or bug (or wall which is checked in a different place) it means that we can safely move the snake. If we are in the TRON mode this is very easy. We just have to add one point for every new piece and push a new head’s position into the existing snake array.
The situation is little more complicated when we are no longer in the TRON mode. The tail is then not sticky, so we have to remove it from the snake array. This tail will be the new head. But before pushing it into the same array, we have to remember about making it smaller. While entering the TRON mode we saved the current length of the snake as a variable prevLength.
After leaving the TRON mode, we also have to decrease the length of snake by 10 pieces until the prevLength value will be zero again and the snake’s length will be the same as before entering the TRON mode.
Favicon on canvas
Probably most of you didn’t notice that tiny detail, but the whole favicon is done in a canvas element.
Because of the size limitations we couldn’t use standard png icons. It was straightforward to use existing code and simply draw already defined elements like food. And it was also very easy to update the graphic and colors during play. Have you notice it changes while entering the TRON mode?
Snake.UI.initFavicons = function(mode) {
	this.icons = {};
	this.icons['snake'] = this.getFavicon('snake');
	this.icons['tron'] = this.getFavicon('tron');

	var link = document.createElement('link');
	link.type = 'image/x-icon';
	link.id = 'canvas-favicon';
	link.rel = 'shortcut icon';
	document.getElementsByTagName('head')[0].appendChild(link);

	this.iconLink = link;
	this.updateFavicon(mode);
};

Snake.UI.getFavicon = function(mode) {
	var canvasWH = 32;
	var canvas = document.createElement('canvas');
	canvas.width = canvasWH;
	canvas.height = canvasWH;

	var ctx = canvas.getContext('2d');
	ctx.fillStyle = this.color[mode].bg;
	ctx.fillRect(0, 0, canvasWH, canvasWH);
	ctx.fillStyle = this.color[mode].food;
	this.paintFaviconFood(ctx, canvasWH, this.cells.food);
	ctx.fillStyle = this.color[mode].wall;
	this.paintFaviconWall(ctx, 28);

	return canvas.toDataURL("image/x-icon");
};

Snake.UI.updateFavicon = function(mode) {
	if (this.iconLink.dataset.mode !== mode) {
		this.iconLink.href = this.icons[mode];
		this.iconLink.dataset.mode = mode;
	}
};
During the initialisation we have to create and append into head a tag indicating the favicon icon. We also have to generate the favicons and this is what getFavicon method does.
It just creates a new 32 x 32 canvas element, drawing the proper background color, food icon (just the same way as explained before for the game board) and walls.
When the image is ready it just converts the canvas to the icon format and saves it as a DataURI string.
 Favicons drawn in canvas
Both generated strings (one for each mode) are saved in the icons object. Later on, when there is a need to change the favicon, we don’t have to generate the whole canvas and repeat the operation. Instead, we just need to replace the href of the favicon tag so it matches the mode.
Mobile tweaks
SnAkE game was also submitted to the mobile category. In order to make it work on touch devices, despite handling the touch events and drawing extra buttons on the screen, we had to implement a special tweak for sounds. Like (I suspect) most of the entries, we used the jsfxr library to handle sounds. At first we had a working solution with one audio stream and an updatable source for each sound (which is different for every action). Unfortunately this didn’t work on mobile, so we came up with a better idea:
Snake.Sound.sounds = {
    // Example sound - entering the TRON mode
    enterTronMode: [
        jsfxr([0,,0.0864,,0.4458,0.2053,,0.3603,,,,,,0.2349,,0.4484,,,1,,,,,0.5]),
        jsfxr([0,,0.2012,,0.4803,0.2939,,0.326,,,,,,0.525,,0.6112,,,1,,,,,0.5]),
        jsfxr([0,,0.2424,,0.2184,0.2631,,0.2023,,,,,,0.2315,,,,,1,,,,,0.5]),
        jsfxr([0,,0.0429,,0.4426,0.5,,0.2284,,,,,,0.1798,,,,,1,,,,,0.5]),
        jsfxr([1,,0.2311,,0.2188,0.2821,,0.0801,,,,,,,,,,,1,,,,,0.5])
    ]
};

Snake.Sound.initAudio = function() {
	Object.keys(this.sounds).forEach(function(name){
		var sounds = this.sounds[name];

		// Mobile Safari on iOS seems to have trouble loading so many audio elements
		// and their sounds, so we limit sounds to one per type.
		// Except tronMove type, because it sounds way better when having different
		// tone on each turn.
		if (isiOS && name !== "tronMove") {
			sounds = [ sounds[Snake.Game.random(0, sounds.length - 1)] ]; // pick up random one so there can be different sounds on each refresh
		}

		sounds = sounds.map(function(sound){
			var player = new Audio();
			player.src = sound;
			var promise = player.play();
			player.pause();
			return player;
		});

		this.sounds[name] = sounds;
	}.bind(this));
};

Snake.Sound.play = function(name) {
	if (this.isMuted) return;

	var i = Snake.Game.random(0, this.sounds[name].length - 1);
	if (Snake.MOBILE) {
		this.sounds[name][i].currentTime = 0;
	}
	this.sounds[name][i].play();
};
During initialisation, a new audio stream is created for each specified sound. The big issue with mobile Safari is that it does not allow to play more than one audio stream at once. In order to accommodate that we pick only one, randomly selected sound.
The most important part of the initAudio method is, that after each initialisation, the current element is played and immediately paused. This is the trick that will make sounds work on mobile. But in the end we applied that solution also to the desktop version because it allows us to play a few sounds at the same time (which is helpful in TRON mode).
Another mobile improvement we implemented was extracting a background canvas from the one with the play board. This solution improved the overall performance, especially on mobile, because there is no need to draw all the pixels in every loop. If we had more time, we could improve it even better. Bearing in mind that we store the whole board’s array, we could save also the previous board’s state, compare those arrays and draw on the main canvas only those pixels which actually changed in the current loop.
And by the way, this is an interesting fragment of an article wrote by the author of the Nokia’s 3300 Snake game that we stumbled upon:
One thing that I do remember is the way that the game only updated the screen where necessary each frame. These days, it’s pretty common to do a full screen refresh each frame on mobile games, but on the older devices, it was worth being careful about full screen updates. In Snake, only the head, tail and any food that popped in or out needed to be updated each frame. Doing this meant the frame rate would keep to a steady 15 fps no matter how long the snake got.
Conclusion
That’s it for now. I shared some interesting parts of the SnAkE game but there is a lot more delicious staff like calculating the timer of the bugs, drawing pixel fonts or handling key inputs. You can dig into the code base in the repository. As always let me know if you have any questions in the comments section below.