 Mastermind game in React and ES6
The best way to learn new technologies is to make something interesting, fun, engaging and unconventional. In this tutorial I will walk you through a Mastermind game I built to show some of the most fundamental ideas behind the React library, ECMAScript 6 specification and Webpack module bundler.
ECMAScript 6 is the newest edition of the ECMAScript Language Specification, which standardises the JavaScript programming language. ES6 introduces a new syntax and features which we will take a closer look at later in this article. It’s worth mentioning that not all of the browsers support those fancy features so it is important to use a special compiler like Babel to make sure that our code written in ES6 will run correctly on older browsers.
React is a library made by Facebook which uses a concept of Virtual DOM, which aims to apply as few mutations as possible. When the element’s state changes, React decides whether an actual DOM update is necessary by comparing changes in his Virtual DOM with the actual DOM.
React’s philosophy also leans towards clean separation between components. One of the library’s features is a one-way data flow which means that child components cannot directly affect parent components.
Before we start I want to let you know that the whole repository is available on Calanthe/mastermind.
Setup and initialization
As mentioned before, in order to run ES6 smoothly, we need to use Babel which will compile JavaScript ES6 syntax into ES5. We will also use JSX which is a JavaScript syntax extension, very similar to well known XML. Before starting coding, we need to setup the project and configure compilers. Let’s use Webpack to build working JS files:
//install webpack globally
npm i -g webpack
//install necessary modules locally
npm i --save-dev webpack@^1.0.0 babel-loader babel-preset-es2015 babel-preset-react path
The whole Webpack configuration is specified in the webpack.config.js file, which defines the inputs, the outputs of the project and types of transformations we want to perform. Some of the most important fragments are:
module.exports = {
  entry: {
    game: './game.js' //which file should be loaded on the page
  },
  output: {
    path: path.resolve('./dist'), //where the compiled JavaScript file should be saved
    filename: './game.js', //name of the compiled JavaScript file
  },
  module: {
    loaders: [
      {
        test: /\.js?$/, //translate and compile on the fly ES6 with JSX into ES5
        exclude: /node_modules/,
        loader: 'babel',
        query: { //query configuration passed to the loader
          presets: ['react', 'es2015']
        }
      }
    ]
  }
};
If you run the npm run watch specified in the package.json file:
"scripts": {
  "watch": "webpack --progress --colors --watch --config ./webpack.config.js",
  "build": "webpack --config ./webpack.config.js"
}
You will be able to load your file:///PATH_TO_FOLDER/dist/index.html file in the browser.
As we specified in the configuration, our entry file is ./game.js:
import React from 'react';
import ReactDOM from 'react-dom';
import Mastermind from './src/mastermind';

ReactDOM.render( //initialise game with specified codeLength and Map of colors properties
  React.createElement(Mastermind, {codeLength: 4, colors: new Map([[0, 'zero'], [1, 'one'], [2, 'two'], [3, 'three'], [4, 'four'], [5, 'five']])}),
  document.getElementById('mastermind')
)
As you can see at the top of the file, there are imported three modules: react, react-dom which serves as the entry point of the DOM-related rendering paths and our Mastermind code.
After importing modules, the Mastermind code is initialised and rendered into the DOM within the element whose ID is mastermind, defined in the ./dist/index.html file:
<!DOCTYPE html>
<html lang="en">
<head>
  <meta charset="UTF-8">
  <link rel="stylesheet" type="text/css" href="./styles.css">
  <title>Mastermind in React and ES6</title>
</head>
<body>
<div id="mastermind"></div>
<script src="game.js"></script>
</body>
</html>
In the script tag we include the game.js file which should be in the same dist folder as index.html. If the Webpack’s entry and output points are configured correctly, the ./dist/game.js file should be compiled based on the aforementioned ./game.js source file.
Introduction to the React components
The project is setup so let’s focus on the most interesting part - programming the Mastermind game itself. The whole game module will be divided into a few components. A component is a React class, which should be responsible for one thing only. As mentioned before, React has unidirectional data flow so it is important to keep as many of components as possible stateless. As Facebook’s developers recommend:
A common pattern is to create several stateless components that just render data, and have a stateful component above them in the hierarchy that passes its state to its children via props. The stateful component encapsulates all of the interaction logic, while the stateless components take care of rendering data in a declarative way.
Let’s look at the top components I’ve created for the Mastermind game:
const Rules = React.createClass({...});
const DecodingBoard = React.createClass({...});
const CodePegs = React.createClass({...});
const EndGame = React.createClass({...});

const Mastermind = React.createClass({
  (...)
  render: function() {
    return (
      <div>
        <Rules state={this.state} toggleRules={this.toggleRules}/>

        <div className="clearfix">
          <DecodingBoard state={this.state} activatePeg={this.activatePeg} submitPegs={this.submitPegs}/>
          <CodePegs state={this.state} colors={this.props.colors} activatePeg={this.activatePeg}/>
        </div>

        <EndGame state={this.state} reloadGame={this.reloadGame}/>
      </div>
    );
  }
});
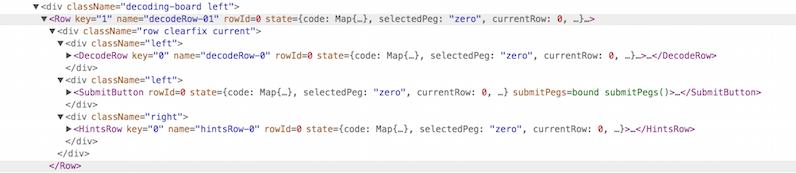
Mastermind is our stateful component which passes state to its child components: Rules, DecodingBoard, CodePegs and EndGame. Of course those sub components can also encapsulate other child components, like DecodingBoard and Row in this example:
const SubmitButton = React.createClass({
  render: function() {
    return (
      <button></button>
    );
  }
});

const Row = React.createClass({
  render: function() {
    (...)
    return (
      <div>
        <div className='left'>
          <DecodeRow (...)/>
        </div>
        <div className='left'>
          <SubmitButton (...)/>
        </div>
        <div className='right'>
          <HintsRow (...)/>
        </div>
      </div>
    );
  }
});

const DecodingBoard = React.createClass({
  render: function() {
    (...)
    rows.push(<Row (...)/>);
    (...)
    return (
      <div className="decoding-board left">
        {rows}
      </div>
    );
  }
});
The whole components’ hierarchy is more readable on the following diagram:
 The React components' hierarchy
This is how those components look like in the Chrome’s React extension:
 DecodingBoard in the Chrome's React extension
One of the first new features of ES6 I want to introduce to you are modules. If you noticed earlier in the ./game.js file, I imported three modules at the top of that file:
import React from 'react';
import ReactDOM from 'react-dom';
import Mastermind from './src/mastermind';
Modules are already known to the front-end community. There were implemented via different libraries like RequireJS or Browserify but fortunately now we can use the native solution built in ES6. One of the principal of modules is that they have to be specified in one dedicated file. Every module is a singleton, which means that there exists at most one instance of the module regardless of how many times it was imported. The whole module is executed once it is loaded and it’s content is encapsulated, preventing the pollution of the global namespace.
Exporting modules in ES6 is very easy and straightforward:
export default MastermindWe have a few React classes defined in the ./src/mastermind file but we want to expose only one value. The default export syntax means that the other ES6 modules can only access that one particular class, and it can only be read without any modifications. The ./src/mastermind module exports the Mastermind class because it is a child module and can’t export modules that have been defined elsewhere.
Props versus states
Components in React are state machines, which means that the DOM is updated only based on the new state.
Components have also predefined methods, called lifecycle methods which are executed at specific points in a component’s lifecycle.
There is no point of reviewing all of them but it is worth keeping in mind that there is: a componentWillMount, invoked just before rendering; a componentDidMount invoked just after rendering; and a shouldComponentUpdate where we can specify if there is a need to render particular component.
Let’s take a deeper look at the Mastermind class itself. As mentioned before, it is the main React class which encapsulates sub classes and pass data to them. In React there are two kinds of properties: props and states and the difference between them is crucial to understand the whole philosophy behind React.
Both of them are plain JS objects and their changes trigger render() update. Props are passed to the child within the render method of the parent and are immutable in the child components. The child components should be as stateless as possible and just render those props values. The best example of such stateless component in the Mastermind game is the SubmitButton:
const SubmitButton = React.createClass({
  render: function() {
    const className = classNames({
      'submit': true,
      'hidden': !(this.props.state.currentGuess.size >= this.props.state.pegsInRow && this.props.state.currentRow === this.props.rowId)
    });

    return (
      <button className={className} onClick={this.props.submitPegs}></button>
    );
  }
});
Based on props passed by it’s parent module, it renders a <button> element with proper attributes like class name and onClick method. As you can see, those props values are accessible here via this.props object.
But how can we change those passed values? This is what states are for. Contrary to child components, parent components are stateful, which means that usually based on the user’s action, they can mutate the states values and pass them down. That’s why props and state are related. The state of one component will often become the props of a child component. Like here:
//./game.js
ReactDOM.render(
  React.createElement(Mastermind, {codeLength: 4, colors: new Map([[0, 'zero'], [1, 'one'], [2, 'two'], [3, 'three'], [4, 'four'], [5, 'five']])}),
  document.getElementById('mastermind')
)
The codeLength and colors are passed to the Mastermind module and accessed there by this.props.colors and this.props.codeLength values:
//fragment of the render() method in the Mastermind module
render: function() {
  return (
    <div>
      <CodePegs selectedPeg={this.state.selectedPeg} colors={this.props.colors} activatePeg={this.activatePeg}/>
    </div>
  );
}
The selectedPeg state is initialised in the predefined getInitialState() function which is executed exactly once during the lifecycle of the component and sets up all state:
//in the Mastermind module
getInitialState: function() {
  return {
    code: this.getCode(), //the main code to be decoded
    selectedPeg: this.props.colors.get(0),
    currentRow: 0,
    currentGuess: new Map(),
    exactMatches: 0,
    valueMatches: 0,
    pegsInRow: 4,
    attempts: 10,
    rules: false,
    success: false,
    endGame: false
  };
},
Despite the getInitialState method, the Mastermind module also contains other functions:
const Mastermind = React.createClass({
  getInitialState: function() {},
  reloadGame: function() {},
  toggleRules: function() {},
  getCode: function() {},
  activatePeg: function(event) {},
  submitPegs: function() {},
  render: function() {
    return (
      <div>(...)</div>
    );
  }
});
This is considered to be a good practice, because the stateful Mastermind component has all of the callback functions and pass the state down through props.
When the callback functions call this.setState() method and mutate states, React takes care of re-rendering components.
As you probably noticed, each of the components have a render method. It is a required method responsible only for returning the single child element. As you can see it always returns either HTML tags or another child component which will eventually render to HTML.
JSX
As mentioned before, I used the JSX syntax extension. It is possible to skip JSX and use plain Javascript. Instead of:
return (
  <div className="decoding-board left">
    {rows}
  </div>
);
I could write:
return (
  React.createElement('div', {className: "decoding-board left"}, rows)
);
I prefer to use the JSX extension, because it is more familiar syntax for defining tree structures with attributes.
I think that I covered all of the most important basics of React library. It will be easier now to understand how the Mastermind game works.
Generating the code to guess the peg colors
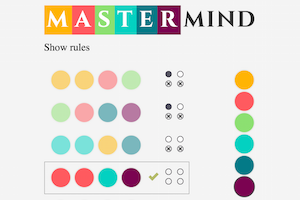
I assume that you already are familiar with the rules of the Mastermind game. If not, take a look at this useful Wikipedia description.
The first thing that needs to be done at the beginning of the game is create the auto generated code that the user will have to guess. We do that in the getCode method:
getCode: function() {
  const code = new Map();

  let generateCode = (i) => {
    code.set(i, this.props.colors.get(this.getRandomArbitrary()));
  };

  times(this.props.codeLength)(generateCode);

  return code;
}
The above code is straightforward once you understand the new ES6 arrow functions. The expression generateCode = (i) => {i}; is a shorter syntax than generateCode = function (i) { return i };.
It not only looks much better but it also lexically binds this, so there is no need to use .bind()
or var that = this, anymore.
I also started using the keywords const and let to declare a variable. One of the biggest drawbacks of ES5 is that var creates a variable scoped within its nearest parent function. This leads to hoisting issues which sometimes requires using closures to fix. Let scopes the variable to the nearest block, which includes also loops and conditional statements. The main difference between let and const is that the const declaration creates a read-only reference to a value so once defined it cannot be re-assigned.
Despite not being fully supported by React I used Map to store data about code pegs and current guess made by the user. The Map is a new data structure in ES6, which itself is just an object with a simple key-value map. The keys can be any type, including strings and objects. It is very easy to compare two Maps, get its size and alter its values.
I just declare code as a new Map() object and for each of the four code pegs, I generate a random number from 0-5 which is later on represented as a particular color. The generated values are stored in the Map object by using a code.set() method.
getRandomArbitrary: function(min = 0, max = 5) {
  return Math.floor(Math.random() * (max - min + 1)) + min;
},
The getRandomArbitrary function is an example of an ES6 function with a default parameter. This means that if no value is passed to the method this.getRandomArbitrary(), the parameters min and max are initialized with default values function(min = 0, max = 5).
let times = (n) => {
  return (f) => {
    Array(n).fill().map((_, i) => f(i));
  };
};
The times method is a functional-ish method created to prevent me from using for var to iterate n times. I found that solution really clean and useful.
Building the board and pegs
The decoding board located on the left consists of ten rows, where each of them includes:
DecodeRow, where the user makes his/hers attempts,SubmitButton, which verify the selected value,HintsRowto indicate which pegs are chosen correctly.
The key value passed down to each child component is a necessary value which helps React handle DOM changes in a minimal way.
const DecodingBoard = React.createClass({
  render: function() {
    let rows = [];
    let rowName;

    let generateRow = (i) => {
      rowName = 'decodeRow-' + i + 1;
      rows.push(<Row name={rowName} key={i + 1} rowId={i} state={this.props.state} activatePeg={this.props.activatePeg} submitPegs={this.props.submitPegs}/>);
    };

    times(this.props.state.attempts)(generateRow);

    return (
      <div className="decoding-board left">
        {rows}
      </div>
    );
  }
});

const Row = React.createClass({
  render: function() {
    const isCurrentRow = this.props.state.currentRow === this.props.rowId;
    const rowClassName = classNames({
        'row': true,
        'clearfix': true,
        'current': isCurrentRow
      });
    const hintsRowName = 'hintsRow-' + this.props.rowId;
    const rowName ='decodeRow-' + this.props.rowId;

    return (
      <div className={rowClassName}>
        <div className='left'>
          <DecodeRow name={rowName} key={this.props.rowId} rowId={this.props.rowId} state={this.props.state} isCurrentRow={isCurrentRow} activatePeg={this.props.activatePeg}/>
        </div>
        <div className='left'>
          <SubmitButton rowId={this.props.rowId} state={this.props.state} submitPegs={this.props.submitPegs}/>
        </div>
        <div className='right'>
          <HintsRow name={hintsRowName} key={this.props.rowId} rowId={this.props.rowId} state={this.props.state}/>
        </div>
      </div>
    );
  }
});
The classNames module originally was part of React, but now it stands up as an additional utility library. It is a really useful module which helps joining classNames together.
Instead of:
const rowClassName = isCurrentRow ? 'row clearfix current' : 'row clearfix';I have now definitely more readable solution:
const rowClassName = classNames({
  'row': true,
  'clearfix': true,
  'current': isCurrentRow
});
Some interesting stuff is happening in the DecodeRow class. First of all, I didn’t want to update all of the already guessed rows. In such situations, the shouldComponentUpdate method comes in handy:
//do not update already submitted row
shouldComponentUpdate: function(nextProps) {
  return nextProps.state.currentRow <= nextProps.rowId;
}
The shouldComponentUpdate is very effective in situations when we are sure that the re-rendering of the component is redundant.
The nextProps variable has access to the properties passed to this component and based on that we can calculate if there is a need to proceed with re-rendering.
The render method of the DecodeRow component looks like this:
//the `DecodeRow` component
render: function() {
  let pegs = [];
  let idVal;
  let pegClass;

  let generatePeg = (i) => {
    idVal = this.props.name + '-' + i + 1;
    //update current row
    if (this.props.state.currentRow === this.props.rowId) {
      pegClass = this.props.state.currentGuess.get(i) ? 'peg ' + this.props.state.currentGuess.get(i) : 'peg';
    } else { //clear all of the next pegs - from the previous game
      pegClass = 'peg';
    }

    pegs.push(<Peg idVal={idVal} name={this.props.name} value={i + 1} key={idVal} pegClass={pegClass} isCurrentRow={this.props.isCurrentRow} activatePeg={this.props.activatePeg}/>);
  }

  times(this.props.state.pegsInRow)(generatePeg);

  return (
    <div className='decode-row'>
      {pegs}
    </div>
  );
}
The peg’s css class depends on the preselected pegs located on the right hand side, which I just called CodePegs. This is the place where the user can select colors he/she want to use on the decoding board on the left.
Those selected values are stored in a Map called currentGuess and they can take any value predefined in the ./game.js values: zero, one, two, three, four, five. It is important at this point to pass the correct value so the styles will be applied accordingly to the chosen pegs from the right.
The Peg component is responsible for displaying markup based on the passed props. This is another example of a stateless component:
const Peg = React.createClass({
  render: function() {
    return (
      <span className={this.props.pegClass}>
        <input type='radio' name={this.props.name} value={this.props.value} id={this.props.idVal} onClick={this.props.isCurrentRow ? this.props.activatePeg : null}/>
        <label htmlFor={this.props.idVal}></label>
      </span>
    );
  }
});
Every peg in the game (on both left and right sides) is represented as <input type='radio'/> which is responsible for storing necessary values and corresponding <label> element which is used for styling purposes only. This is how pegs are styled:
/*input only stores values, we don't need to show it*/
input[type="radio"] {
  display: none;
}

/*the label is the rounded colored element*/
.peg input[type="radio"] + label {
  display: inline-block;
  border: #EAEBE9 2px solid;
  border-radius: 50%;
  (...)
}

/*selected peg has little darker border*/
.selected input[type="radio"] + label {
  border-color: #525554;
}

/*the first peg has orange background color*/
.zero input[type="radio"] + label {
  background: #FFB400;
}
As you probably already figured out, the className value sets the css class attribute. It is called className instead of just class, because JSX gets translated to JS, where class is already in use.
User actions and peg selection
Pegs on the decoding board located on the left change their state (which is represented as colors) based on the selected peg on the right. By default the first peg (orange one) is selected, which is marked with a darker border.
As mentioned before, the Peg is the lowest module in the hierarchy. The user actions are handled by the onClick attribute onClick={this.props.activatePeg}.
The activatePeg method is defined in the Mastermind module:
activatePeg: function(event) {
  //if one of the peg on the right was selected
  if (event.target.name.startsWith('peg')) {
    this.setState({ selectedPeg: event.target.value });
  } else {
    //else if one of the pegs on the decoding board was selected
    if (this.state.selectedPeg) { //if peg on the right was selected
      this.setState({ currentGuess: this.state.currentGuess.set(event.target.value - 1, this.state.selectedPeg) });
    }
  }
}
The new selectedPeg state is set when one of the right pegs was selected. Every peg in the game is represented as an <input> so its value is really easy to get.
After changing the selectedPeg state, React takes care of the re-rendering and the selected peg is set as active.
You can see here the startsWith ES6 method, which determines whether a string ‘peg’ begins with the characters of another string, in this example - name of the input on the CodePegs board.
In the situation when the peg on the decoding board is selected, the currentGuess state is updated: this.setState({ currentGuess: this.state.currentGuess.set(event.target.value - 1, this.state.selectedPeg) });.
The currentGuess is a Map structure, where a proper value identified by a event.target.value - 1 key, has to be changed to the preselected peg: this.state.selectedPeg.
Once again, after changing the state, React renders the updated board.
Let’s take a guess!
After choosing four pegs, the user can submit a guess to check if they are correct. The submit button is visible only when all of the four pegs in one row are selected.
On selection, the this.props.submitPegs is called:
submitPegs: function() {
  let code = new Map(this.state.code);
  let pegs = this.state.currentGuess;
  let foundKey;
  let exactMatches = 0;
  let valueMatches = 0;

  // First pass: Look for value & position matches
  // Safely remove items if they match
  for (let [key, value] of pegs) {
    if (value === code.get(key)) {
      exactMatches++;
      pegs.delete(key);
      code.delete(key);
    }
  }

  // Second pass: Look for value matches anywhere in the code
  for (let [key, value] of pegs) {
    // attempt to find the peg in the remaining code
    foundKey = this.keyOf(code, value);
    if (foundKey !== -1) {
      valueMatches++;
      // remove the matched code peg, since it's been matched
      code.delete(foundKey);
    }
  }
}

keyOf: function(map, valueToFind) {
  for (let [key, value] of map) {
    if (valueToFind === value) {
      return key;
    }
  }

  return -1;
}
First we need to copy the Map object which represents a randomly generated color code (which - as a reminder - consists of 4 pegs). It is important to make a clone of the object, because later on we are going to delete some of its values and we don’t want to alter the main color code.
After initializing values, we do two important steps. First, we want to go through the selected pegs and compare their values and positions with the generated color code. If there are any pegs with the same position and color, we need to remove them from Maps because we don’t want them in the next step of calculations. We also need to count those pegs whose position and values are the same, in order to show the hints circles as matching values (styled as black pegs).
Notice, that in order to loop through Map objects, we need to use the for (let [key, value] of pegs) {} syntax.
In the second pass, we need to find all of the selected pegs which are anywhere in the code and mark them later with a white color. To do that I used the simple implementation of the keyOf function, which returns either -1 or the key of the item found.
I have to admit that the above algorithm wasn’t invented by me. I found this really interesting discussion and applied those findings to my game.
if (exactMatches === this.state.pegsInRow) {
  this.setState({ endGame: true });
  this.setState({ success: true });
} else if (this.state.attempts === this.state.currentRow + 1) {
  this.setState({ endGame: true });
}

this.setState({exactMatches: exactMatches});
this.setState({valueMatches: valueMatches});
this.setState({currentRow: this.state.currentRow + 1});
this.setState({currentGuess: new Map()});
After the pegs’ validation, we need to increment the currentRow value, reset the currentGuess Map, so the user can take another guess and update the exactMatches and valueMatches needed by the HintsRow component.
HintsRow provides feedback about selected pegs. The small black peg is placed for each code peg which is correct in both color and position. So there should be exactMatches black pegs and valueMatches white hint pegs:
const HintsRow = React.createClass({
  render: function() {
    const hints = [];

    let idVal;
    let hintClass = '';
    let exactMatches = this.props.state.exactMatches;
    let valueMatches = this.props.state.valueMatches;

    let generateHint = (i) => {
      hintClass = 'hint';
      idVal = this.props.name + '-' + i + 1;

      //update current row
      if (this.props.state.currentRow - 1 === this.props.rowId) {
        if (exactMatches > 0) {
          hintClass = hintClass + ' exact-matches'; //black peg
          exactMatches--;
        } else if (valueMatches > 0) {
          hintClass = hintClass + ' value-matches'; //white peg
          valueMatches--;
        } else {
          hintClass = hintClass + ' none-matches'; //cross - no guess
        }
      }

      hints.push(<Hint key={idVal} hintClass={hintClass} rowId={this.props.rowId} state={this.props.state}/>);
    };

    times(this.props.state.pegsInRow)(generateHint);

    return (
      <div className="hints-row">
        {hints}
      </div>
    );
  }
});
If all of the pegs selected by the user are in the correct location, we have to update the endGame status and inform the user about the success. If the current row is the last one and the user still didn’t guess the pattern, then the game is over.
const EndGame = React.createClass({
  render: function() {
    const endGameInfoClass = classNames({
        'endgame': true,
        'hidden': !this.props.endGame
      });
    const endGameStatusClass = classNames({
        'endgame-relative': true,
        'success': this.props.success,
        'failure': !this.props.success
      });
    const infoText = this.props.success ? 'Congratulations!' : 'GAME OVER!';

    return (
      <div className={endGameInfoClass}>
        <div className={endGameStatusClass}>
          <h2 className="endgame-header">{infoText}</h2>
          <button className="endgame-btn" onClick={this.props.reloadGame}>PLAY AGAIN</button>
        </div>
        <div className="endgame-relative endgame-overlay"></div>
      </div>
    );
  }
});
Summary
I know that this is a rather long post and I really appreciate that you stayed with me this far :). I focused only on the most important parts of the game. The code related to enhanced functionality like reloading the game and toggling game rules I will leave as an exercise for you!
Let’s summarise what we’ve just learned about ECMAScript 6 and React library.
ES6:
- There are new
letandconstvariable declarations, mostly to avoid hoisting. - The
str.startsWith()is one of the newest string method, which determines whether a string begins with the characters of another string. - Maps are one of the new data structures which support a few handful methods like:
set,get,has,delete. - Use
for (var value of myArray) {}to iterate throughMaps. - Arrow functions
=>are useful when you want to automatically bindthis. - It is possible to create and import modules.
- The
default parameterof the function allow parameters to be initialized with default values if no value is passed.
React:
- A component is a React class, which ideally is responsible for one thing only.
- Always return one DOM element which wraps child components or markup inside.
- Event handlers modify the state and
render()reflects the current state. - The
classNamekeyword is used becauseclassis taken in ES6. As wellhtmlForinstead offor. Propsare immutable in the child components.Statesare mutable. After altering them, React takes care of re-rendering components.- Variables in
JSXare passed in{}. - Re-render components as little as possible, remember about the
shouldComponentUpdatemethod.
I am aware that I barely touched the subject of ES6. I would highly recommend reading this well written online book about EcmaScript 6 by Dr. Axel Rauschmayer or just look into the Mozilla JavaScript documents if you are interested in going deeper into this topic.
In this particular example React may not be faster than standard native DOM operations. There are various discussions about the performance of that library. Despite that I would recommend to use it even for small games like this. At least you to get know the newest technology better in a fun, interesting way.
Big thanks to Rob Berry and Richard Nguyen for mentoring me while writing this game and article.