 Purrfect - a Node Knockout multiplayer game
Node Knockout is one of the most popular 48h, online hackathon featuring node.js. Together with my friends: @mchmurski, Ania and @lukaszwojciak we wanted to make a multiplayer, enjoyable game with a catchy idea - popular cat memes as main characters!
The main purpose of the Purrfect game is to jump as fast as you can to reach the highest (300th) level before other players do - for the cat's glory! To run faster and jump higher, you can bounce off the walls or look for Nyan's catnip powerup. After consuming a catnip, your cat is blessed by Nyan cat's rainbow power, and as a result it gets extra skills to reach very high areas.
Purrfect is a multiplayer game and it was written in both server-side (node.js, Socket.IO, express) and client-side (lithiumJS, pixijs, Spine) technologies. In this article I will walk you through some of the most fundamental code fragments but I want to focus only on the client-side part of the implementation.
Animations with Spine
Spine is an application which allows to easily create 2D skeletal animation for games. You have to prepare proper graphic assets by yourself - the whole character and separately all of the individual parts of its body. Once you have this, you can prepare all of the character's animations used in the game. When you're finished, the prepared animation can be exported in JSON or binary file and used easily in further development. This list of video tutorials should be very helpful if you want to understand this topic better.
As I mentioned before, we wanted to use famous cats to be our recognized, which take part in a race. After choosing the most characteristic memes, the following assets have been prepared:
Business cat

Chemistry cat

Grumpy cat

Keyboard cat
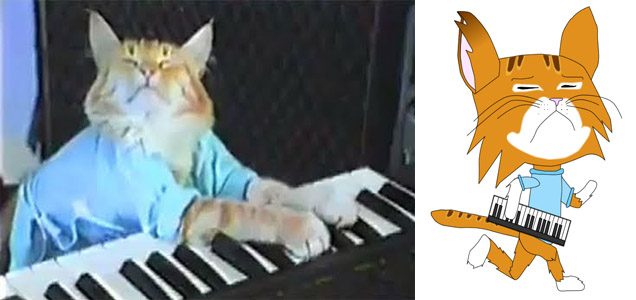
Bread cat

Because of the limited, 48h time of the competition, we managed to animate only the chemical cat.
Rendering with Pixi.js
Pixijs is a JavaScript framework, which renders 2d WebGL fast graphic with canvas fallback. We decided to use this library, because since it supports Spine animations, it is the easiest solution to combine it with our animated cat.
This is how rendering the basic stage and background looks in Pixi.js:
//get canvas element
var canvas = document.querySelector('#canvas');

//PIXI will detect renderer (WebGL or canvas fallback) automatically
var renderer = PIXI.autoDetectRenderer(800, 600, canvas);

//create PIXI container, which represents a collection of displayed objects
var container = new PIXI.DisplayObjectContainer();

//A Stage represents the root of the displayed tree.
//Everything connected to the stage is rendered
var stage = new PIXI.Stage(0x000000,false);
stage.addChild(container);

//now load and render the background
var tiling = PIXI.Texture.fromImage('/img/game.png'),
    tilingSprite = new PIXI.Sprite(tiling);

stage.addChildAt(tilingSprite,0);
The following snippet shows an example code of how players are rendered:
//first load exported Spine animation
var assets = ['/spine/skeleton.atlas', '/spine/skeleton.json'];

var loader = new PIXI.AssetLoader(assets);
loader.onComplete = loaded;
loader.load();

//now create a text object with name
var text = new PIXI.Text(player.name, {font: '16px Arial', fill: 'white'});

//for each player
for (var item in players) {
    if (players.hasOwnProperty(item)) {
        id = players[item].id;

        //load Spine animation
        player[id] = new PIXI.Spine('/spine/skeleton.json');

        //set id, name and avatar
        player[id].id = id;
        player[id].name = players[item].name;
        player[id].avatar = players[item].avatarName;

        //render text with name above cat
        text.anchor.x = 0.5;
        text.anchor.y = 0.5;
        text.position.y = player.position.y;
        text.position.x = player.position.x;
        container.addChild(text);

        //scale cat and render it in a random horizontal position
        //in a specific (100px from top) vertical position
        player.nameTag = text;
        player.position.x = 80 * Math.random() * 10 + 1;
        player.position.y = 100;
        player.scale.x = 0.5;
        player.scale.y = 0.5;

        //set other values, which will be important to compute physics
        player.keyPressed = {};
        player.lockJump = 0;
        player.xspeed = 0;
        player.yspeed = 0;
        player.score = 0;

        //by default cat is in idle/waiting state
        player.state.setAnimationByName('idle', true);

        //if this is my cat
        if (players[item].id === myID) {

            //listen for the key events to control cat
            $(document).keydown(function (e) {
                var k = e.keyCode;

                //when the left arrow is pressed, turn cat to the left
                if (k === 37) {
                    player.scale.x = -0.5;
                }

                //when the right arrow is pressed, turn cat to the right
                if (k === 39) {
                    player.scale.x = 0.5;
                }

                //change animation to running mode
                if (k >= 32 && k <= 40) {
                    player.flying = true;
                    player.state.setAnimationByName('animation', true);
                    e.preventDefault();
                }
            });

            //when user releases the key on the keyboard
            $(document).keyup(function (e) {
                var k = e.keyCode;

                //change animation to idle/waiting mode
                if (k >= 32 && k <= 40) {
                    if (!player.flying) {
                        player.state.setAnimationByName('idle', true);
                    }
                }
            });
        }
    }
}
Very similar but a little more fancy is with the Nyan's catnip:
//first load img with nyan cat and light effect
var powerup = new PIXI.Sprite(new PIXI.Texture.fromImage('/img/nyan.png')),
powerItem = {},
blend = PIXI.Sprite.fromImage('img/lighto.png');
//set position based on values from server
powerup.position.x = 80 * column;
powerup.position.y = position;
//set blend mode to gain fancy effect
powerup.anchor.x = 0.5;
powerup.anchor.y = 0.5;
powerup.blendMode = 'w';
blend.blendMode = 'hxx';
blend.anchor.x = 0.5;
blend.anchor.y = 0.5;
blend.alpha = 0.3;
blend.scale.x = 1;
powerItem.powerup = powerup;
powerItem.type = render;
powerItem.blend = powerup;
powerItem.scaleTo = 1;
powerItem.position = 80 * column;
powerItem.width = powerup.width;
powerItem.height = powerup.height;
//save powerup in array
renderedPowerups.push(powerItem);
//add blend effect
powerup.addChild(blend);
//render powerup
container.addChildAt(powerup, 0);
//in the main loop, add animation to the powerup
//randomly change the size of nyan cat
if (Math.abs(powerup.scaleTo - powerup.blend.scale.y) <= 0.01) {
var random = Math.round(Math.random() * Math.random() * 100 + 80) / 100;
powerup.scaleTo = random;
}
//change the size of light behind the cat
if (powerup.scaleTo < powerup.blend.scale.x) {
powerup.blend.scale.x -= 0.01;
powerup.blend.scale.y -= 0.01;
}
if (powerup.scaleTo > powerup.blend.scale.x) {
powerup.blend.scale.x += 0.01;
powerup.blend.scale.y += 0.01;
}
//rotate it also a little
if (powerup.powerup.rotation > 0.5) {
powerup.rotateTo = -0.6;
}
if (powerup.powerup.rotation < -0.5) {
powerup.rotateTo = 0.6;
}
if (powerup.rotateTo < 0) {
powerup.powerup.rotation -= 0.02;
} else {
powerup.powerup.rotation += 0.02;
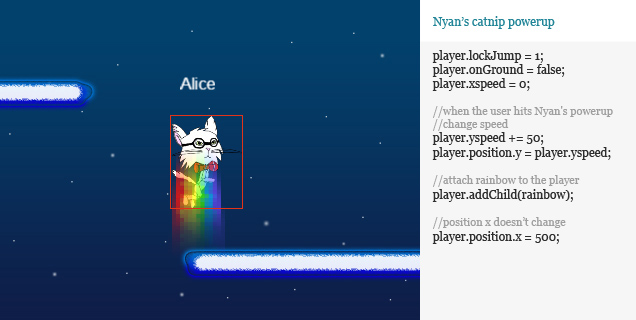
}When the user hits the Nyan's catnip, he/she gets a rainbow effect:
//load rainbow image
var rainbow = new PIXI.Sprite(new PIXI.Texture.fromImage('/img/rainbow.png'));

rainbow.anchor.x = 0.5;
rainbow.anchor.y = 0.5;

//when the user hits Nyan's powerup
//change speed
player.yspeed += 50;

//attach rainbow to the player
player.addChild(rainbow);

//when the powerup is over
if (player.yspeed < 50 && rainbow.parent) {

    //detach rainbow from the player
    rainbow.parent.removeChild(rainbow);
}
This is how the rendered Nyan's catnip powerup and rainbow effect look like:
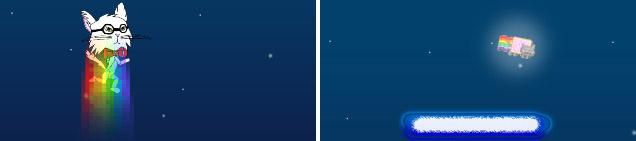 Nyan catnip
For better understanding of PIXI classes and modules, have a look at PIXI API documentation.
Level rendering
Now lets focus on the most important part of the game: rendering tower and ledges. Each levels has to be generated randomly, but players which take part in a race in the same room, have to see exactly the same tower with identical arrangement of the ledges. That's why we implemented a mechanism to randomly generate levels on the server-side. After generating it, each level is stored in separate room. The following code shows some part of the example generated level:
var blocks = {
	empty:0,
	mid:1,
	left:2,
	right:3,
	foreveralone:4
};

var level = [
	[1,1,1,1,1,1,1,1,1,1,1], //starting ledge
	[1,3,0,0,0,2,1,3,0,0,2],
	[1,1,1,3,0,0,0,0,2,1,1],
	[1,3,0,0,0,2,1,1,3,0,0],
	(...)
	[0,0,0,0,0,0,2,1,1,1,1],
	[3,0,0,4,0,0,4,0,0,0,2],
	[1,1,1,1,1,1,1,1,1,1,1] //finish
]
Having this, we can render ledges on the client-side:
//load 4 kind of ledges in 6 different colors
for (var i = 0; i < 6; i+=1) {
    textures[i] = {
        'left': new PIXI.Texture.fromImage('/img/' + i + '_ledge/left.png'),
        'right': new PIXI.Texture.fromImage('/img/' + i + '_ledge/right.png'),
        'middle': new PIXI.Texture.fromImage('/img/' + i + '_ledge/middle.png'),
        'alone': new PIXI.Texture.fromImage('/img/' + i + '_ledge/alone.png')
    };
}

//set vertical distance between ledges in the first 100 rows
var apart = 270;

//get an array of ledges from the server
var ledgesLength = ledges.length;
for (i; i < ledgesLength; i += 1) {

    //set vertical distance between ledges in the second 100 rows
    if (i > 100) {
        apart = 320;
    }

    //set vertical distance between ledges in the third 100 rows
    if (i > 200) {
        apart = 340;
    }

    //compute vertical distance between ledges
    position = lastPosition - apart;
    lastPosition = position;
    j = 0;
    ledge = ledges[i];

    //iterate through every row
    for (j; j < ledge.length; j += 1) {

        //ignore free spaces
        if (ledge[j]) {

            //choose the appropriate ledge
            if (ledge[j] === 1) {
                ledge = new PIXI.Sprite(textures[Math.floor(i/50)].middle);
            } else if (ledge[j] === 2) {
                ledge = new PIXI.Sprite(textures[Math.floor(i/50)].left);
            } else if (ledge[j] === 3) {
                ledge = new PIXI.Sprite(textures[Math.floor(i/50)].right);
            } else {
                ledge = new PIXI.Sprite(textures[Math.floor(i/50)].foreveralone);
            }

            //set position
            ledge.position.x = 80 * column;
            ledge.position.y = position;

            ledge.anchor.x = 0.5;
            ledge.anchor.y = 0.5;

            //save ledge in an array
            renderedLedges.push(ledge);

            //render ledge
            container.addChildAt(ledge, 0);

            //find the last ledge, it will be used to detect if the game is finished
            if (i === ledgesLength - 1) {
                ledge.lastLevel = true;
            } else {
                ledge.lastLevel = false;
            }
        }
    }
}
The above code isn't effective. It computes and generates every type of ledge for each row (up to 300). After implementing this, the fps value slowed down rapidly. We came up with the improved solution, to generate only the next and previous fifty rows of ledges:
//in the main game loop, where collision with ledges is detected:
//if ledge is too far, remove it
if (ledge.parent && Math.abs(ledge.position.y - player.position.y) / 80 > 50) {
ledge.parent.removeChild(ledge);
} else if (ledge.parent === undefined
&& Math.abs(ledge.position.y - player.position.y) / 80 < 50) {
container.addChildAt(ledge, 0);
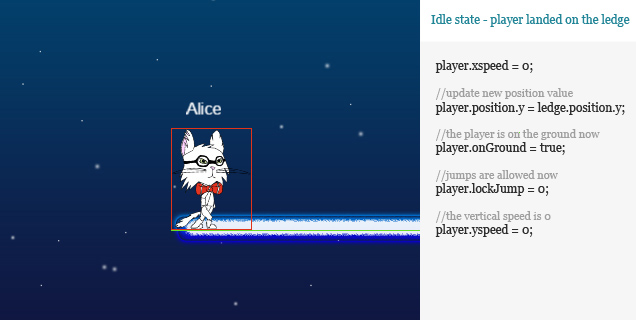
}To detect collision between the player and ledges and walls, we used the simplest but the most effective algorithm for this situation called Swept AABB. Cats and ledges are treated as rectangles, and in each animation frame collision of those figures' coordinates are checked. The whole mechanism was implemented as followed:
collide = function (player) {
    if (player && player.position) {

        //iterate through each ledge
        for (var i = 0; i < ledges.length; i += 1) {
            var ledge = ledges[i];

            if (ledge) {

                //check the horizontal distance between ledge and player
                //remember that each cat is 30px wide
                var xdist = ledge.position.x - player.position.x + 30;

                //check if the horizontal distance is lower than the width of the ledge
                if (xdist - 60 > -ledge.width && xdist < ledge.width) {

                    //check the vertical distance between ledge and player
                    var ydist = ledge.position.y - player.position.y;

                    //check if the vertical distance is lower than the height of the ledge
                    //also make sure that the player is not in a move anymore
                    if (ydist > -ledge.height
                        && ydist < ledge.height
                        && player.yspeed < 0) {

                        //update new position value
                        player.position.y = ledge.position.y;

                        //the player is on the ground now
                        player.onGround = true;

                        //jumps are allowed now
                        player.lockJump = 0;

                        //the vertical speed is 0
                        player.yspeed = 0;

                        //change animaiton to idle/waiting state
                        if (player.flying
                            && !(player.keyPressed[39] || player.keyPressed[37]
                                || player.keyPressed[38] || player.keyPressed[40]
                                || player.keyPressed[32])) {
                            player.flying = false;
                            player.state.setAnimationByName('idle', true);
                        }
                    }
                }
            }
        }
    }
};
As you can see, there is no big mystery in that. Just iterate through each ledge, check if the user's position is in contact with the coordinates of a single ledge and if so, stop the cat and allow it to jump again.
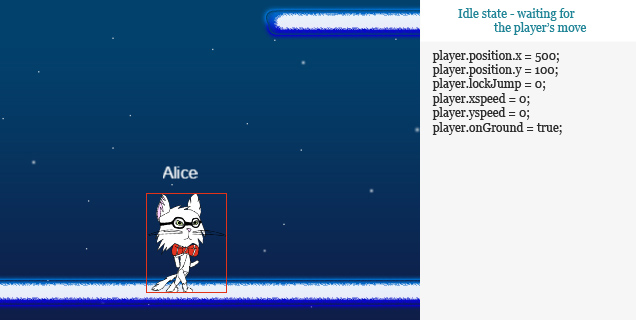
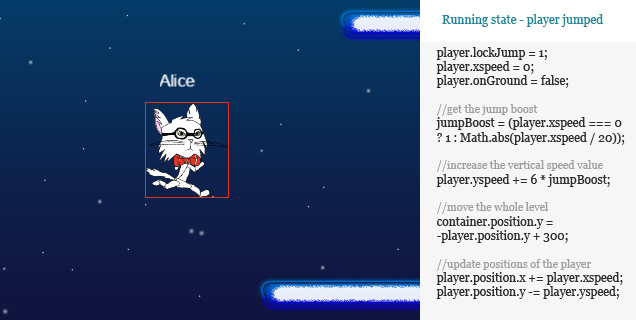
Physics
The physics is a very important yet rather easy part of the Purrfect game. We wanted to accomplish someting similar to the classic Icy Tower game, where you can bounce off the walls to get extra speed and jump higher. This is how we implemented it:
//in the main game loop
animate = function () {
requestAnimationFrame(animate);
for (var player in players) {
if (players.hasOwnProperty(player)) {
if (players[player] === players[me]) {
playa = players[me];
//responding to keyboard
//the left arrow key is pressed, so move the cat to the left
if (playa.keyPressed[37]) {
playa.xspeed -= 0.6;
}
//the right arrow key is pressed, so move the cat to the right
else if (playa.keyPressed[39]) {
playa.xspeed += 0.6;
}
else {
//slow down a bit
if (playa.xspeed > 0) {
playa.xspeed -= 0.9;
} else if (playa.xspeed < 0) {
playa.xspeed += 0.9;
}
//stop the cat
if (Math.abs(playa.xspeed) < 1 && playa.xspeed !== 0) {
playa.xspeed = 0;
}
}
//speed limits
if (playa.xspeed > 27) {
playa.xspeed = 27;
}
if (playa.xspeed < -27) {
playa.xspeed = -27;
}
//when the space bar is pressed
if (!playa.lockJump && playa.keyPressed[32]
|| playa.position.y === 580 && playa.keyPressed[32]) {
//get the jump boost
jumpBoost = (playa.xspeed === 0 ? 1 : Math.abs(playa.xspeed / 20));
if (jumpBoost < 1) {
jumpBoost = 1;
}
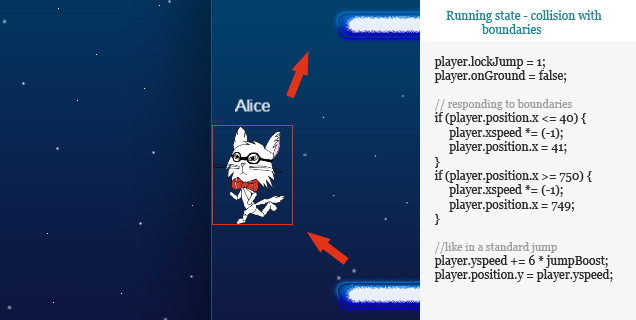
//increase the vertical speed value
playa.yspeed += 6 * jumpBoost;
}
// responding to boundaries
if (playa.position.x <= 40) {
playa.xspeed *= (-1);
playa.position.x = 41;
}
if (playa.position.x >= 750) {
playa.xspeed *= (-1);
playa.position.x = 749;
}
//move the whole level to show 300px above the current player
container.position.y = -players[player].position.y + 300;
//slow down when hit the ground on the ledge
if (playa.onGround) {
playa.yspeed = 0;
}
//update positions of the player
playa.position.x += playa.xspeed;
playa.position.y -= playa.yspeed;
//detect collision with the ledges
collide(players[player]);
}
}
}
renderer.render(stage);
};I am aware that the above code snippets may not be the easiest to understand. That's why I prepared more appealing examples:
Conclusion
Node Knockout'13 was my first hackathon which I participated in. It was a hard but enjoyable weekend. I had a real occasion to face my tiredness and it turned out, that despite a small amount of sleep I was able to think logically without any major problems.
Together with my team, we had lots of fun during the development. We wanted to create a multiplayer, playable game with memorable characters. Despite many problems and one major crisis, we managed to accomplish more or less what we had planned to do.
The most important thing for me, is to learn new, fascinating technologies, which help in creating html5 games. Such events, are the best way to achieve that. I learned some basics about Pixijs and Spine and improved knowledge related to the node.js and sockets. But most of all, I am glad that I spent fantastic time with people who share similar interests to mine and have the same urge to make games :). I am more than sure, that it won't be the last hackaton, in which I participate.
Appendage
During the judging process we got a few opinions that Purrfect would be much better with the additional single player mode. Some people were disappointed, that they couldn't play the game, because of lack of any online opponents. Of course, there is a possibility to play with yourself, just by joining the same game in another browser or a tab. But in this case, the game gets boring really fast, it lacks all the fun and enjoyment. That's why we started working on single-player version of the game. The unstable version can be tested here. This *remake* will be fulfilled with the new set of powerups, redesigned tower, all of the planned cats as characters and lots of other *kitty* improvements. We also plan to conquer the mobile world and release the iOS version of the Purrfect game. Stay tuned!